If you already have photos on your smartphone, you probably know what “geotagging” means: The photo is saved with the location where the photo was taken. You can search for photos more quickly and have them displayed on a map.
As of today’s portatour® update, geotagging of call reports is now possible on demand, i.e. portatour® can optionally store where the report was entered. You can use this functionality to show your employer, without any additional effort, that you were indeed at the customer’s premises. Geotagging helps with documentation for tax-free allowances (per diems) and is also used to avoid mistakes, since you would see if a report is about to be entered for the wrong customer.
The only prerequisite is that you always create the report immediately after the customer visit, i.e. while you are still geographically close.
Activating the geotagging functionality
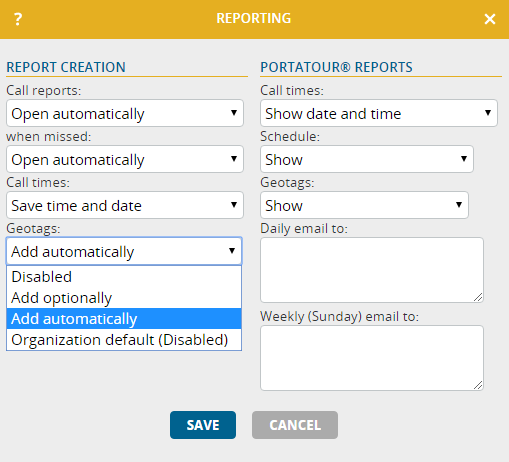
By default, geotagging is deactivated. To use the function, it must be activated in the Options under Reporting. In the Geotags selection box, switch the setting from “Disabled” to “Add optionally” or “Add automatically”. As with most options in portatour®, a default value can be set for the company account and changed individually on a per-user basis.
Creating a geotagged call report
If you have configured the setting to “Add automatically” in the options, when you create a new call report, for example by clicking “Called Now” while still at the customer, your location is automatically determined and added as a geotag to the report. Your device typically takes 1 to 10 seconds to find your location. You can already start filling in the report during this time. The geotag is shown in the report form below:
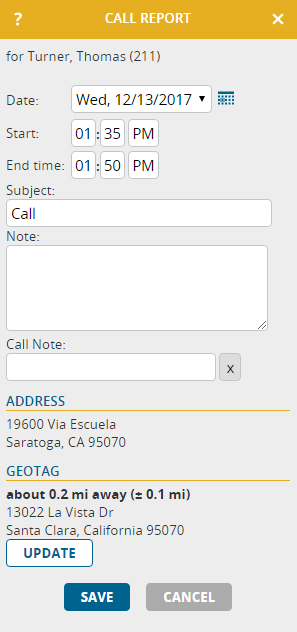
You can find the following information in the geotag:
- Distance from your location to the customer visited or appointment attended as a beeline calculation. This value shows how far away you are from the actual address visited when you create the report. The address visited appears in the report directly above the geotag.
Values up to several hundred meters are perfectly normal, e.g. due to large company premises, a distant parking space, any inaccuracy in the geocoding of the customer address or in the determination of the location.
If the distance is significantly greater, this can be a warning sign that you are not entering the report for the right customer! - Accuracy of the found location. The location is determined by your device, and accuracy can vary due to technologies used and any signal hinderances. The actual distance should be considered in relative terms with regard to the precision of the geotag. If the accuracy is too imprecise, you can use the “Update” button to launch a new determination of the location.
- Address of your location. Keep in mind that the street and building number will rarely coincide exactly with the visited address. Small distances or inaccuracies can easily lead to a crossroad, parallel street or to another building number.
If you have set the option to “Add optionally”, the geotagging is not automatically launched when the report is created. It takes a click on the “Add” button for the geotag to be appended to the call report.
A call report can only be geotagged at the time of report creation. It is not possible to subsequently add, change or delete a geotag in a call report.
Tip: If you have little time immediately after the customer visit, we recommend immediately creating and saving the call report . This only takes a few seconds and also works in offline mode. Later, you can enter any missing information (e.g. notes), in the evening. This procedure ensures accurate times and geotags in the reports, allows you to update the schedule at any time, since portatour® has registered all the completed visits, and also prevents you from forgetting to enter reports.
The location function must be enabled for your device to find your location. Furthermore, you have to instruct the web browser to allow portatour® to actually use it. If there are problems finding your location, you will receive an error message after 30 seconds, at the latest, which will be stored in the geotag of the call report. For troubleshooting, contact your device support.
Displaying call reports with geotags

Geotags are displayed in three places in portatour®:
- In portatour® Anywhere: When you open a call report for editing, the geotag is displayed but cannot be edited.
- In the portatour® Report: If in the Options, under Reporting, in the section “portatour® Reports”, you set Geotags to “Show”, the geotags for the last 7 days are also displayed in the portatour® Report. A default value for this setting can be configured both company-wide and individually modified on a per-user basis.
- In an Excel/CSV-Export of the call reports: There are new columns that contain the geotag information detailed above.
Additional information regarding geotagging
- Geotags are only available for “Called Now” and “Missed” reports. No geotags can be assigned for other report types (Clock In, Clock Out, Day Off, Other).
- Users must validate and save each geotag on their own. For this reason, geotags are not available for automatically generated reports, i.e. if in the Options, under Reporting, Report Creation is set to “Create automatically”, then geotagging is disabled.
- For call reports entered in offline mode, only the distance and accuracy are displayed in the geotag. To determine the address, an online connection is required; the address will be completed once the report is subsequently uploaded to the server.
- If you are running portatour® Anywhere in combination with a host system (Salesforce, Dynamics CRM), geotagging is not yet possible.