This news concerns administrators and supervisors of company accounts with activated territory optimization.
There are three new settings under “Initial situation > Settings” to adapt the territory analysis and optimization even better to your situation. The layout of this page has also been revised.
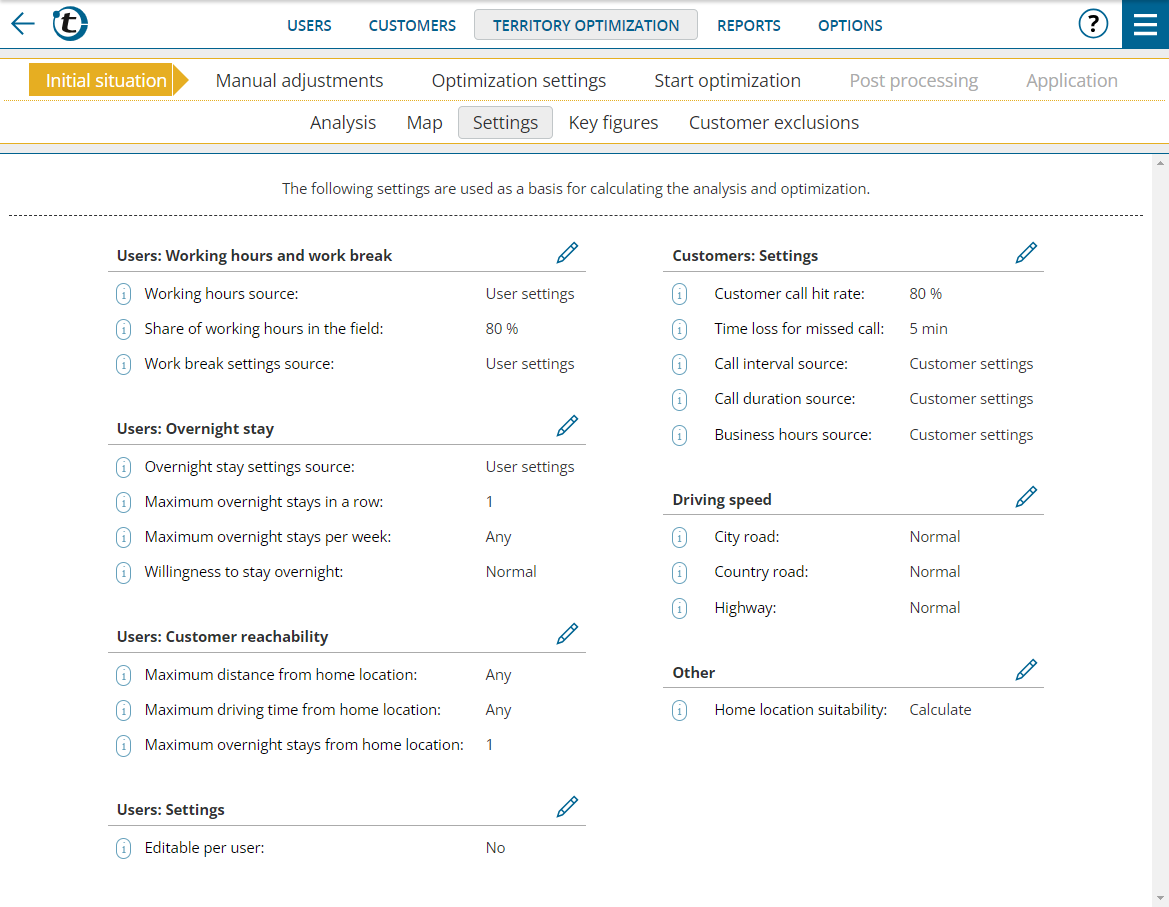
Users: Overnight stay > Willingness to stay overnight
When calculating the expected number of overnight stays, territory optimization takes into account all settings for overnight stays in portatour®. Nevertheless, in practice it can happen that the field rep spends the night away from home more frequently or less frequently, e.g. due to manual overnight stays at home location or in hotels.
To take this into account in the territory optimization, you can influence the number of overnight stays with the new “willingness to stay overnight” setting. “Low” leads to fewer calculated overnight stays and more driving time, “High” to more overnight stays and less driving time.
Under “Manual adjustments > User modifications”, this setting can be edited individually for each user. If you want to edit this setting individually in the initial situation, set “Editable per user” to “Yes”.
Note: Please note that changing the setting does not affect the number of overnight stays in all cases. If, for example, only a few customers meet the criteria for overnight stays away from home, increasing the willingness to stay overnight will not lead to more overnight stays, as more overnight stays are not required or permitted.
Users: Customer reachability > Maximum overnight stays from home location
In addition to the maximum distance or maximum driving time, this setting allows you to specify the maximum geographical extent of a territory. By default, a customer must be reachable with a maximum of one overnight stay from the home location – this usually corresponds to a distance of over 1,000 km. If you want to allow even larger territories in exceptional cases, set this value to “Any”. This will slow down the calculation speed.
Under “Manual adjustments > User modifications”, this setting can be edited individually for each user. If you want to edit this setting individually in the initial situation, set “Editable per user” to “Yes”.
Driving speed
portatour® uses historical driving speed data collected by navigation system and mobile phone providers by measuring the movement data of millions of road users and making it available for the respective road sections.
To deviate from these average values during territory optimization, use this setting. The changed setting applies equally to all territories.