“Power-users” of portatour® already adopted them into their daily work: custom fields at Customers, Appointments, and Call Reports. portatour® can be personalized this way to fit your individual business workflows.
New since the release on 11/4/2013 are option sets (drop-down lists) as possible values for custom fields.
Do this to get started: open Options > Custom Fields. Create a new field and choose Data type: Option set
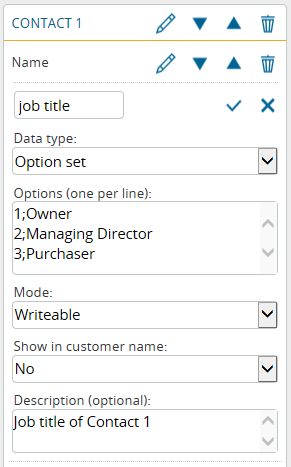
Write the desired options in the text-box below, one per line. In a line you can enter a key, followed by a semikolon, and a display text. See an example in the screenshot above.
What’s the key for? In other software systems there is often a number value required for a field. Setting the key to a number or a different thing than the displayed text makes date import&export easier. Using a key also allows you to change the displayed text later. You don’t have to modify or update the stored data, as long as you keep the key the same. You can choose any value for a key, a number or text or a kombination. If you do not set a key, portatour® will automatically set an alphabetical key for you.
Note: The menu item “Custom Fields” is only visible in the options window, when you are using portatour® Anywhere without a connection to a CRM system. You also have to be a single user or an administrator in a multi-user setup. In case you are using portatour® Anywhere in combination with Microsoft Dynamics CRM or Salesforce, you can define custom fields directly in the CRM system and synchronize them with portatour®. In case you are using portatour® Connector, edit the configuration file (XML). portatour® in combination with Outlook does not support custom fields due to limits implied by Outlook.
New is also the possibility to show custom fields in the customer name. Use it to show the field inside brackets everywhere in portatour® where the customer name is shown.
Example: You want to show the customer number and A-B-C classification next to the name of the customer. Enable show in customer name for both fields and your customers will show up as “Customer-name (Customernumber, Classification)”. For example: “Max Headroom Inc. (95014, A)“. See this in the customer list and search results, schedule, and portatour® Report.